Wednesday, November 22, 2017

Pick the correct name

Picking up a correct name for the software component is one of the hardest things that every developer has to deal with. Here I refer component as anything in your source code, it can be a variable name, function name, class name or anything. Having a perfect name for the component is a huge achievement it improves the readability of your code so let's find out some of the qualities of a good name.


This is a swarm, in Sinhalese we called this animal as "thisara" which means it can live in water, air or land or can live in all three spaces. What a perfect way to define the behavior of an object by its name.


Let's list down some of the core qualities a name should have.

  • Readability.
  • Pronounceability.
  • Representing one context.
  • Do not use acronyms.
  • Follow two points are taken from a tweet of Robert C Martine ( AKA uncle bob )
  • The length of a variable name should be proportional to its scope. The length of a function or class name is the inverse.

Tuesday, October 10, 2017

How I performed a Redis fail over.

Recently we have encountered a failure, on one of our Redis nodes due to reaching the maximum number of clients connected. As an immediate action for resolving the incident, we wanted to modify the existing connection timeout property of the node and do a failover master node into a slave, since the master node is not responsive anymore.


The approach we followed for the first time.

We modify the redis.conf file on both master and the slave nodes. Then do a Redis service restart on the master node. Due to the service restart on the master, slave promoted itself into a master node.

The disadvantage of this approach is, once the master is restarting, it is losing any of the ongoing operations in the master node. This is not the appropriate approach recommended by the Redis.


The approach recommended by Redis.

Redis has inbuild command to failover master node into a slave node.
CLUSTER FAILOVER [FORCE|TAKEOVER]

we have used takeover option since both servers are running as expected and we just wanted to switch the master. Once we execute this command on the slave node, master stop consuming any new Redis connections and it waits till all existing connections complete their processing. Once completed, the master becomes the salve and hand over the master responsibilities to the other node. By following this approach, we did not lose any transactions like the previous approach.

Modify config values during the runtime.

We have used,
CONFIG SET
ex :
CONFIG SET timeout 70

For listing all the config, you can use

CONFIG GET *
ex:
CONFIG GET timeout

With this config set command, it will effect immediately on the instance but, keep in mind to change the Redis.conf file in order to apply the change in case of a service restart otherwise you will lose any changes you have done during the runtime.

Sunday, July 16, 2017

Are you limiting your rate with Thread Sleep ?

Let me start with two scenarios where you may have encountered before.

Scenario 1: You have an application which connects to a queuing service and suddenly you lose the network connectivity.

Scenario 2: Your application invoking an external API and it starts to reject your calls due to the high rate of access.

If we look at those two, you may think it's really simple to solve those issues by sleeping the thread. For the first scenario, you can define a maximum number of retries and sleep in between each retry. For the second scenario, imposing explicit thread sleep will reduce the rate of your API access.

Let's assume we are checking connectivity each second and assume we got the connectivity by 6.5 seconds. If we use a sequential approach such as thread sleep, we are attempting 7 times to establish a connection.

When re connecting we have to consider two key aspects

  1. Limit number of attempts ( each attempt is an overhead to the application)
  2. Reconnect should happen as soon as connectivity back to normal.

If we increase the sleep time to reduce the attempts it leads us to violate the second aspect. So it is important to understand that sequential approach is not the best approach for many cases. There are other sequences that may be more suitable for your scenario such as linear, Fibonacci.


Limiting the rate of calls with spring-retry

With spring retry we can try out few different approaches, it can be a linear or Fibonacci or a custom approach.With the latest spring versions you may find this as a feature of the frame work but if you are not using spring or using an older version of spring framework, you can use this library as a dependency.So we are no longer required to use thread sleep as our default wait mechanism as well as we are not required to re invent the wheel when we wanted to try out some other re trying sequence.


Please visit the spring retry git hub project for more information and examples.

Sunday, July 9, 2017

Are your dependencies safe to use?

Using components with known vulnerabilities is the ninth item described by the OWASP top ten and widely ignored item in application security.According to the article "The Unfortunate Reality of Insecure Libraries" most of us are not aware of that, our application contains well-known vulnerabilities.
Follow are some interesting finding of the article.

  • 29.8 million (26%) of library downloads have known vulnerabilities
  • Security libraries are slightly more likely to have a known vulnerability than frameworks
  • Java apps are likely to include at least one vulnerable library
  • The most downloaded vulnerable libraries were GWT, Xerces, Spring MVC, and Struts 1.x


So it is really important to inspect our dependencies very frequently against those known issues.
OWASP dependency checker is a tool which is used to identify vulnerabilities in Java. Since it comes with Maven, Gradle, Ant plugins it is really easy for a developer to inspect those vulnerabilities. It also comes as Jenkins plugin so we can easily integrate and check periodically for vulnerabilities without human intervention.

Integrating OWASP Dependency checker for Maven.
Include following plugin in to your plugins section of the POM file.

<plugin>
 <groupId>org.owasp</groupId>
 <artifactId>dependency-check-maven</artifactId>
 <version>2.0.0</version>
 <executions>
    <execution>
                 <goals>
                         <goal>check</goal>
                       </goals>
                 </execution>
        </executions>
</plugin>


Once plugin is configured we can invoke the plugin by executing following maven goal

mvn clean install

It will cross check your dependencies against the vulnerability data base and generate a report if anything suspicious available. But keep in mind there can be false positive results as well.

Example report:

[INFO] Analysis Complete (5 seconds)
[WARNING] 

One or more dependencies were identified with known vulnerabilities 
in prject name: jar-file-name-1.3.1.jar (jar-file-name:jar-file-name:x.x.x,
cpe:/a:groupId:artifact_id:x.x.x) : CVE-2020-9999, CVE-2020-4444444 See the dependency-check report for more details. [INFO]

Sunday, June 11, 2017

Gettting rid of hell of code merge

If I asked you to list down what are your most awkward moments in software development life cycle that you are facing, you definitely list merging codes as the top most item. Since our code merge tools are not intelligent enough to perform semantic code merging, almost all the tools fail to merge two source code file where more than one developer has changed on the same line on the same file. We can hope that in future there will be tools to address the issue, but for now, we have to admit that.

Is that all we can do?

It is true that we can not totally get rid of the merge hell but we can take some measures to reduce the complexity. I've seen teams consume more time to merge their code than it took for the actual development. So what are the factors that determine how complex your code merge?

Basically, there are two.
  • The size of the code chunk that you are about to merge.
  • The time gap between the last merge.


complexity = size * duration.

If you need to reduce the merging complexity, then you have to reduce the both factors. In continuous integration we often say, integrate frequently with non-breaking code chunks.

In reality, it is not easy to commit small code chunks frequently that are not breaking anything or any others work. Usually, developers wish to isolate their work from others. If you are a git lover you have branches, if you need deep isolation you choose forks. It's good to be isolated but some point you are in big trouble.

Hassle-free integration.

You are not the first victim of this issue, most of the organisations have struggled with this and tried out new approaches to this address this merge complexity. Trunk based development aka TBD is an approach that successfully adopted by industry giants which encourage teams to work on a single branch(trunk) which leads less code merge problems and introduce plenty of new problems. However, it is worthy to try this approach since so we are soo fed up with huge merges.

for more info:

https://trunkbaseddevelopment.com/

Tuesday, December 13, 2016

My Guide to terraform - Part 3

By now we know what is Terraform, why it is there and how to create a resource with it. In this post, I'm going to modify resource which I created and lastly destroy the infrastructure we create.

Updating an infrastructure
Let's modify the instance type. Previously we create an instance with t2.micro size so now I need something bigger than that, so I modify my previous script.


resource "aws_instance" "example" {
  ami           = "ami-13be557e"
  instance_type = "t2.medium"
}

First thing first, before do any thing to your infrastructure, execute a dry run.

It clearly specifies there will be an update in resources ,( -/+ ) symbol stands that.

instance_type: "t2.micro" => "t2.medium" (forces new resource)

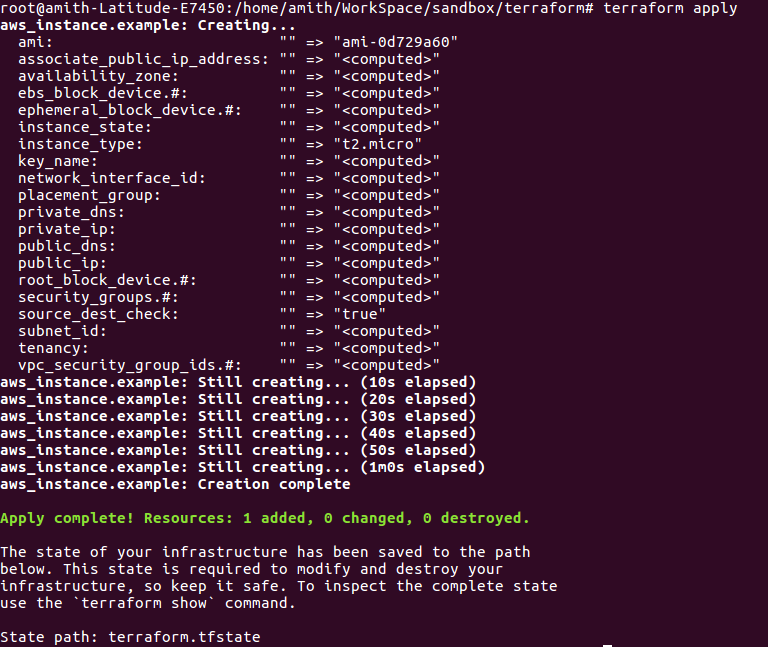
This is what we expected, whenever an update happens on ec2 instance type AWS destroy existing ec2 and gives us a new instance. Let me apply it and check the status.


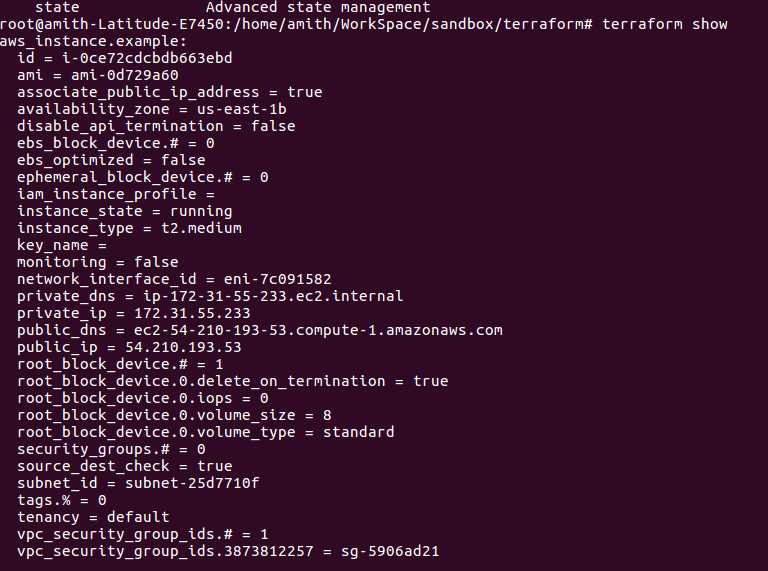
As we expected our infrastructure is changed and new resource with t2.medium is available.


Destroying an infrastructure.

Before moving to destroy I' wanted to do an experiment. Usually, If you need to modify or delete an AWS resource you need an ID but in our previous example we didn't specify any identification, so where they come from. Definitely, it should be retrieved from the status file. So I'm going to delete the status file and apply another instance size change.


Then I execute terraform show
It gives me there is no status.
Then I execute terraform apply
This time it gives me shine new instance instead of updating existing instance.

So keep in mind, never ever delete the status file, that why terraform also keeping a backup file whenever a change happens.So the best place to keep this is your repository. Make sure to commit this status file along with other source code.


Removing an infrastructure also soo easy with terraform. Same steps as before, first we change the code, go for a dry run then apply the changes.
This time dry run is little bit different
terraform plan --destroy
to actual deletion
terraform destroy

My Guide to terraform - Part 2

During my past blog post on Terraform we discuss what is Terraform and why it is so popular among platform engineers.In this post, we will have a look on how to install Terraform on ubuntu machine and we will discuss instantiate an ec2 instance with Terraform.


Installing Terraform.
  • Step 1: First, we have to download the correct distribution for the operating system. All available distributions are available in the following location url
  • Step 2:It comes as a zip file, that contains binary version of a Terrafrom application so lets unzip the file to a folder in the file system.
    
    cd /home/amith/Documents/Software
    unzip terraform_0.7.13_linux_amd64.zip
    
    
  • Step 3: Now we have to add this binary file path into path environment variable, otherwise, we have to navigate to the directory which contains the distribution in order to execute it.

    PATH=/usr/local/terraform/bin:/home/amith/Documents/Software:$PATH

  • Step 4: execute the following command for checking the installation.If it return set of commands that means we are good to go

    terraform


Use case: Instantiate a t2.micro aws instance

As we discussed previously it's all about writing a source code. As all other source codes terraform also associated with a file extension and usually it is .tf.

vi ec2_create.tf

Before going forward we need few data.

  1. Valid aws access key and a secret key.
  2. Valid aws ami(amazon machine image)
  3. Instance type.

Here is the sample code.

provider "aws" {
  access_key = "ACCESS_KEY_HERE"
  secret_key = "SECRET_KEY_HERE"
  region     = "us-east-1"
}

resource "aws_instance" "example" {
  ami           = "ami-0d729a60"
  instance_type = "t2.micro"
}

Before move further try to understand the source.There are two ways of defining a resource with Terraform.

  • Terraform format - we use .tf extention
  • JSON format - we use .tf.json.

Why we have two formats and when to use them?

JSON is more machine friendly language so if you plane to generate terraform script in problematically make sure to use JSON format. But if you need a more human-friendly way of defining infrastructure then go with terraform format. Actually, terraform format is a wrapper for JSON, so there is no harm of using any one of them. It's up to you decide the appropriate format for the scenario.


Planing and applying

If you remember the goals we discussed in previous blog post, Terraform support dry runs, by using that feature we can plan the final outcome before actually doing the change.To run a plan you have to navigate into the file location where you define the terraform code.

cd /home/amith/WorkSpace/sandbox/terraform
terraform plan


this will take some time and generate a report.


Explain plan.
Plan: 1 to add, 0 to change, 0 to destroy.
This section summarizes the final outcome. According to this, it says one resource has to create and no any update or delete.


+ aws_instance.example

This section describes which resource going to create, + symbol denote a new resource creation. If it is - that means item is about to remove and if it is +- that means resource about to update.

For more simplicity in this report they use color codes

  • green - items to be created
  • red - items to be removed
  • orange - items to be update


If you look closer you may have seen there are some sections without values.
    availability_zone:        ""
    ebs_block_device.#:       ""
    ephemeral_block_device.#: ""
    instance_state:           ""

Those values will be generated by the provider since this is a dry run those data are not available at the moment.
Now we have a fair understanding of what will be the out come so let's create the resource.

terraform apptly

this process takes some time to complete. Every 10 seconds it update the report.Once this is completed Terraform will create a new file which contains status(metadata) about the infrastructure and saved on the same location - terraform.tfstate.If you plan to share the code make sure to share this file as well.Without this file terraform will note able to do an update or show a status report next time so it's really important to keep this file safe.


To inspect the status.
terraform show

My Guide to terraform.

What is terraform

Terraform is a tool for building, changing, and versioning infrastructure safely and efficiently. Terraform can manage existing and popular service providers as well as custom in-house solutions. - Terraform start guide.

Well, this briefly explains what it capable of. So let's look at some of the key goals of Terraform as per the author of this nice technology.


  • Unify the view of resources using infrastructure as a code.
  • It's all about writing some code to model your infrastructure. You specify the resource on code snippet and describe it and hand over to Terraform to create it. The beauty of modeling an infrastructure as a code is, it brings all other advantages we got from a source code.Simply we can keep them on a repository, version them, review them, integrate with a CI/CD pipeline, automate the tests on infrastructure.

  • Support the modern data center ( IaaS, PaaS, SaaS )
  • It's capable of handling any of the above, as an example

    • IaaS --> EC2 is an infrastructure as a service by the AWS.
    • PaaS --> AWS OpsWork.
    • SaaS --> RDS.
    Terraform can integrate with any on those services.

  • Expose a way to safely and predictably change the infrastructure.
  • With Terraform you don't need to go and create the infrastructure. You can predict the infrastructure by dry running or here we called it plan. It gives you a report on your infrastructure and how it will be once you execute the script.Then you can review the changes and safely build or upgrade the infrastructure without affecting to any of existing.

  • Provide a workflow that is technology agnostic.
  • You don't have to bound to any specific provider. You can instantiate an ec2 which is AWS and you can use some other platform to create a database.


If you already playing with the infrastructures you should have plenty of questions on Terraform because you have played with other technologies which sound similar to Terraform.

It's not Chef or Puppet, both of them are cool technologies where we use to install and manage software on a hosts in other words they are managing configurations but Terraform is not.But you can use any of those configuration management technologies along with Terraform to configure the infrastructure which created with it.

CloudFormation, yes it has some similarities. Terraform inspired by the problem they solved the problem of modeling infrastructure as a code. But it is limited to a specific provider, you can't create a hybrid infrastructure with CloudFormation.

SDK like python boto empowered developers to access cloud providers in a programmatic way but terraform is not used for pragmatic access to cloud its simple infrastructure modeling in a human friendly way.

I think this is enough for a single blog post will meet you soon with another blog post with my hands on experience with terraform.

Wednesday, November 20, 2013

Java Logging - The true life saver

How you tackle a defect in your code, specially a server side code? Are you remotely debugging the code at first step? Yes it is convenient to do so and most of the time it save you from the defect. The real question is, can it save you from defects all the time? Imagine you have written a code which is highly dependable on external factors such as data base connection, server level configurations and fortunately all goes well in development environment as well as QA environment. Assume you suddenly got a complaint from the customers that your functionality is not working on production as they expected. How you tackle where it went wrong, are you still willing to perform a remote debug procedure on the production where we need to maintain high availability? Who’s gone to save you now? Don’t worry logger is here. Most of the time it save us from incidents (not all incidents are bugs)


My ABC of defect tackling on a server side code.
  • Try to find any unexpected event on server log at the time the issue was raised.
  • Identify the last known good server log and compare rest with code.
  • If neither of above is able to solve the incident, remotely debug the application.

So it is very important to maintain a good server log. My opinion is we should be able to tackle any issue without remotely debug the code.


Impact on application performance by java logging.

Logging has big influence on application performance since logger has to perform IO operations, string concatenations each time we ask logger to log a message so most of the developers avoid them but it is not advisable to avoid all of them. What we can do is to identify what are needed to be log and what are not. Keep in mind both less and excess logging is not preferable.


Determine the correct type of before log.

I’m using log4j as my logging provider but SL4j is grooming as the standard logging API. In log4j there are four types. It is really important to place log statement on correct category.

DEBUG : The lowest restricted logging type , ideally we should include all the information we need to debug the application but keep in mind DO NOT enable this level on production because it heavily impact on application performance.
Examples :
INFO : More restrictive than DEBUG and only for use to log informative events happens during the execution.
Examples :
WARN : More restricted than INFO and used to log warning and alerts.
Examples : ERROR : Most restricted and used to log exceptions. We need to take those logs as more serious and we must log more details to find out what is wrong.
Examples :
Important facts you should consider while logging.
  • Minimize string concatenations whenever you can.

    String concatenation is a costly operation we should minimize concatenations, even we are using INFO as our debug level so logger is never log anything mark as DEBUG but in JVM it is executed . As I mentioned above DEBUG should contain all the details we should use to tackle the issue so most probably there will be many string concatenations.
    Example : Solution 1 : Check debug level when there are too many string concatenations . Solution 2 : Use parametrized logger framework such as SL4J.

  • Minimize possibility of throwing exception while logging.

    Example :
    There are two possibility of getting NPE in above log statement. I’ve seen scenarios where actual exceptions are hidden by the exceptions thrown by the logger statements so try to avoid them because loggers are here to help us not to worst the situation.

    • Make sure logger is not null before log. Sometimes we are accidently using inherited logger instance which may not be initialized.
    • Make sure “person” object never be null in above statement.

  • Use descriptive log statement.

    Is there any use of follow log statement?

  • Never log sensitive data such as passwords, credit card numbers.
  • Avoid spelling mistakes and try to be grammatically correct all the time.

Thursday, November 7, 2013

Prevention is better than cure (Preventing NPE without null check)

As I mentioned on my previous blog post, NPE (Null Pointer Exception) is the most common exception in java. But if you are having enough attention on to your code, you can easily avoid most of the possibilities of getting NPE. The easiest cure, probably the most common cure for NPE is checking null values whenever there is a doubt. Check follows extreme case.

This works fine, but is this cute? Unarguably this is not the best way to prevent NPE. Think twice, why we do not trust the values return by the bean accessors? If we trust them our code will be like this.

How we can achieve this?
It is not that much hard to archive this. Most of the developers think the sole usage of mutator method is to change the value of the variable. But it is not, check follow bean.

Now we can guarantee, no accessor method will return a null value. Still we are getting an exception (IllegalArgumentException) but keep in mind it is good to getting exception early as possible and here we know the exact reason for getting the exception.

Monday, November 4, 2013

Can you spot a NPE (Null Pointer Exception)?

What is the most common exception that java developer are experiencing? The straight forward answer is NPE. Here I’m not going to discuss all the possibilities of NPE but one freak possibility of getting NPE, you may miss while debugging the code.

Did you spot the NPE possibility ?

This code seems to be fine, there are null checks, no chance of getting NPE at for each loop ( it throws NPE if the list is null ). So where is the NPE possible loophole? Value of get(0) may be null. List is not like other collections, it can contain null values. So two things to remember.
  1. Do a null check before call trim method whenever there is a chance of getting null values as a String.
  2. List is a sequence of objects so there is no limitation of having null as an element of the list, Set also can contain at most one null element. So beware of such hidden null values.

Sunday, November 3, 2013

Till we move to Diamond Operator

Have you ever come across a scenario, where a single line of code may not be enough to declare a generalized collection? If you don’t remember, just refresh your memory with follow simple code example. It is pretty obvious, the redundant generalization cause the lengthy collection declaration. There is no wrong here but the language should do the RHS for us. Because the future of the code is depends on the cleanness of it.

How about follow code sample, which one is clearer to read or understand.

How we do it?
Before java 7, there is no automatic type inference feature or an operator bundled with java. In java 7 there is a way, it calls the diamond operator.

Functionality of Diamond operator. <>
Following code line has same effect as the above two map declarations.

Way for pre java 7 developers.
Generic static factory method is their survivor.

Tuesday, September 4, 2012

Genarics vs it's byte code

Lets begin this discussion with some code samples

sample 1 class with out generics
sample 2 class with generics

As every one can see sample one class does not generalize its map but in sample two it is generalized.Now we compile both classes and we get two byte codes , Lets name them as byte code 1 and byte code 2 .

Are those two byte codes are same or not ?

If you look blindly you may answer that question with no , because every one can see that the content of two classes are different, so there can not be same byte code for both sample one and sample two classes . But truth is they are same.

How they are same and why it is same ?

Its better to know why it is same before we hands on how it is same . Simple answer for why it is same is , to ensure the backward compatibility of the code.Java introduce Generics with java 5 version , if we change infrastructure of java byte code with version 5 those code may not be compatible with previous versions . In simple your pre java 5 classes can not communicate with your java 5 object if their byte code infrastructure is different.

Now we can hands on how it is done.When java compile the source code it ensure the type safety by using generics after that compiler erase all the generics using eraser utility and then compile the source code now there is no generics in the byte code but code is type safe to more information on how this work go to follow this java documentation .

Monday, April 4, 2011

How to use java annotations

                            Annotations are some of the major introduction that came with JDK 5 . And now most of the developers are trend to use annotations. So I decide to write this article about annotations but this may not be suitable for experts who try to discover more with annotations because this article is most suitable for people who does not familiar with annotations.
Before we go further it is better to discuss some of the key factors of java annotations.
  • java annotations were introduced to the java world with JDK 5 (JSR 175)
  • Annotations are providing a strong mechanism to define meta data .
  • It improve readability of the code .
  • Can use in every where inside the code
  • Easy to define (no need of long set of configurations)
Basically there are three types of annotations
  1. Multi value annotations
  2. Single value annotations
  3. Marker annotations

It is easy to understand other two types of annotations if we define Multi value annotations so lets begin our new annotations as a multi value.
/**
 * @author amith jayasekara
 *         
 *         simple multi value annotation
 */
@interface MultivalueAnotaion {

    String message();
    //this will set mata data print number to 23 if there is
    // no explicitly deceleration

    int printNumber() default 23;

}
 

                          We define annotation with @interface . Then we can define over own methods inside the annotation class but keep in mind as interfaces annotation cannot have methods with body . So keep body of the method as empty .There are some restrictions while define method inside annotation.
  • Return type of method should be a primitive value or an Object type.
  • Or it can be a enum or other annotation type.
  • Or it can be array of above types .
  • No other return types are allows to use with annotation methods.
  • And there can not be generics in side annotations.
                         We can define default value for methods with default key word and they will be used if we does not define while using the annotation.

Improving above annotation .
              We can improve annotation with following two properties .
  • What extend the this annotation is retained .
  • Where we use this annotation.
Define what extend that this annotation will be retain.

                      To do that we can use another pre defined annotation called @Retention. There are 3 retaliation policies are defined with this annotation.
  • RetentionPolicy.RUNTIME
Retain annotation definition during the runtime (so java runtime can access meta data)
  • RetentionPolicy.CLASS(default type)
Retain annotation definition in the class file.
  • RetentionPolicy.SOURCE
Retain annotation definition in source file

Define where to use annotation.
                    To do that we can user another pre defined annotation called @Target . Follow are available options . Note that we can define more that one definition but it will give compiler error if we used same definition more that one inside the Element type array.
example :
@Target({ElementType.FIELD, ElementType.METHOD, ElementType.FIELD})
this will give compile errors
check out available options for Element types here

So now we see the improved version of our multi valued annotation.

import java.lang.annotation.ElementType;
import java.lang.annotation.Retention;
import java.lang.annotation.RetentionPolicy;
import java.lang.annotation.Target;

/**
 * @author amith jayasekara
 *        
 *         simple multi value annotation that retain in runtime and that
 *         can be used in class level
 */
@Retention(RetentionPolicy.RUNTIME)
@Target(ElementType.TYPE)
    @interface MultivalueAnotaion {

    String message();
    //this will set mata data print number to 23 if there is
    // no explicitly deceleration

    int printNumber() default 23;

}

                    Now we know how to define a simple annotation but it is no use if we don't know how to use this annotation . Follow is a sample code that define the usage of the annotation.

import java.lang.annotation.Annotation;

/**
 * @author amith jayasekara
 *         sample code for testing annotation in runtime of the programme
 */
@MultivalueAnotaion(message = "sample message")
public class MultivalueAnnotationTest {

    public static void main(String[] args) {
        //we create a object of the class
        MultivalueAnnotationTest test = new MultivalueAnnotationTest();

        //check is annotation is available
        if (test.getClass().isAnnotationPresent(MultivalueAnotaion.class)) {
            MultivalueAnotaion ma = test.getClass().getAnnotation(MultivalueAnotaion.class);
            System.out.println("annotation message " + ma.message());
            System.out.println("annotation print number " + ma.printNumber());
        }
    }
}

Single value annotation
 There is only method definition inside the annotation class.


import java.lang.annotation.ElementType;
import java.lang.annotation.Retention;
import java.lang.annotation.RetentionPolicy;
import java.lang.annotation.Target;

/**
 * @author amith jayasekara
 *         single value annotation
 *         retain till runtime and only be able to apply for method level
 */

@Retention(RetentionPolicy.RUNTIME)
@Target(ElementType.METHOD)
    @interface SingleValueAnnotation {
    boolean isPrintMessage() default true;
}

sample usage
import java.lang.reflect.Method;

/**
 * @author amith jayasekara
 */
public class SingleValueAnnotationTest {
    @SingleValueAnnotation
    public static void annotatedMethod() {
        SingleValueAnnotationTest st = new SingleValueAnnotationTest();
        Class cls = st.getClass();
        try {
            Method method = cls.getMethod("annotatedMethod");
            SingleValueAnnotation ano = method.getAnnotation(SingleValueAnnotation.class);
            System.out.println("is print message " + ano.isPrintMessage());
        } catch (NoSuchMethodException e) {
            System.out.println("no method found");
        }
    }

    public static void main(String[] args) {
        annotatedMethod();
    }
}


Marker annotation
                      If the annotation body does not contain any method that type of annotations are known as marker annotation . And their behavior is very much similar to marker interfaces.
Follow is a sample marker annotation and sample usage code for that annotation

import java.lang.annotation.ElementType;
import java.lang.annotation.Retention;
import java.lang.annotation.RetentionPolicy;
import java.lang.annotation.Target;


/**
 * marker annotations
 * this annotation is available in runtime and  the target is class level
 */
@Retention(RetentionPolicy.RUNTIME)
@Target(ElementType.TYPE)
    @interface MyMarker {
}

sample usage class
/**
 * @author amith jayasekara
 */
public class MarkerAnoTest {
    public static void main(String[] args) {
        MarkerClass mark = new MarkerClass();
        if (mark.getClass().isAnnotationPresent(MyMarker.class)) {
            System.out.println("Mark is marked with marker annotation");
        }
    }
} 
 

There are many pre defined annotation are available with java if you are really interesting with what are they go through follow links .
devx.com

Sunday, February 27, 2011

Optimizing HashMap and HashSet with load factor


                                  Java Collection interface is one of the most used interface in java, it allows developers to choses variety of flexible data structures. Among those data structures one of the mostly using data structure is HashMap and HashSet as well.The question is are we getting full usage from that most commonly used data structure . This topic will cover some of the main details that you may have forgotten about those two data structure. And keep in mind I'm not going to discuss about when to use those two or what are the functionalities of this two in this artcle.
                              Before we going to the topic it is better to know what are the back ground of those two data structures. Basically HashMap and HashSet are derive from one of the most conman data structure called HashTable so it is better to know why we implement HashTable type data structures. The reason for that is speed of searching particular element . In hashing we try to search a element in a constant time “O(1)” . And the load factor of HashTable directly effect to the searching speed 

                               number of stored elements in the table
      load factor =----------------------------------------------------------------------
                                            size of the hash table 

                            If we able to maintain load factor from range of .7 to .75 we are able to search element form the constant time. But keep in mind the load factor is not the only thing that effect to the searching speed of a element in the hast table.

                           Now we check out how this load factor combine with HashTable and HashMap. In the Hashtable documentation they have mentioned how much load factor we have to maintain to get optimal time for searching a element and they strongly recommended to maintain load factor to 0.75
(check java doc for HashMap and HashSet)

So now its is developers responsibility to select a proper intercalation size for the HashMap or HashTable we can do that easily by using constructor
example
Assume there are 750 Person details


Now we can assume we will get O(1) searching time for a finding person from the data structure.

What happen if load factor exceed than initialize? 
Both HashMap and HashSet behave in same way so im using HashMap as example 

HashMap()
          Constructs an empty HashMap with the default initial capacity (16) and the default load factor (0.75).
HashMap(int initialCapacity)
          Constructs an empty HashMap with the specified initial capacity and the default load factor (0.75).
HashMap(int initialCapacity, float loadFactor)
          Constructs an empty HashMap with the specified initial capacity and load factor. 

So every time we exceed the number of element that can have in the data structure with respect to the load factor , JRE restructure the map according to the load factor .This restructuring is little bit expensive so its better to use this feature carefully .by doing this we can improve the performance of the HashMap.

What happen when load factor is 1?
This is the easiest way to avoid restructuring of the HashMap before it. If declare load factor as
1 the restructuring process only happens when number of elements are exceeding the capacity of the HashMap.

Note : Some may have a question about the wasted space when we use this type of declaration . As you can see if we use 1000 as a initial size we know that 250 memory spaces will be wasted but cost of wasting me space is so cheaper than wasting computational time so it is better to have this kind of declaration. But keep in mind this is not good for every situation and it is developer's responsibility to identify what will be used. As an example if we have no idea about how many data items are to be inserted to the data structure don't initialising when construct.

                That's about how load factor effect to the searching time . But in above I've mentioned that the load factor is only one factor that effect to the performance of the HashMap and HashSet . The initial size of the data structure is also effect to the performance and it will discussing on next article because it also little bit of lengthy topic and we need more knowledge about Hashing for it so it is advise to read more about a hashing technique called bucket hashing


Monday, December 13, 2010

Not Only Iterating

In many cases we have to iterate through collections as an example we have to display some data table
in that case we pull data as collection and use iterator(or any other iteration mechanism such as for each loop,enumerations) to traverse
through it. Those iterators are very much handy if we just need to display or visit that item but in real world applications we are  not limited with that viewing part we may need to modify the collection as well
the problem   accrues when we need to do such a things.Assume we need to remove some of the elements from the collection while we are visiting each.
example


basically for -each loops and Enumerations are not allowing modifications to the collection if we use those loops as above example in many cases(@see notes) it throws a common exception called ConcurrentModificationException
this is a common mistake and it can happen in many ways follow  are some cases that this exception may encounter.
1.In multi threaded programming accessing the same collection by two or more   threads
2.In normal scenarios modifying the iterator while it's being iterate.

Avoiding the exception 

for-each loop cannot save us from here so we have to look back with our previous savior Iterator.Iterator object have few functions to modify the collection while iterate.


this will save us from that exceptions if you search through the Google you may come up with this kind of solution.But we have changed our attitude not to use Iterator so we have to find a solution with our for-each loop.
here is the simple solution and we are still stick to the for each :D and this is more safer(@see notes) than using Iterator


notes:
many cases
this exception may not be thrown in some cases and its is depend on the architecture that you are using
if you using struts this exception may not be accours because struts is based on singleton design pattern and there are no multithreaded scenario in struts(STRUTS issue a copy to every one so no need to worry of issues related to multithreaded environment)

more safer
keep in mind to use thread safe collection or make the collection thread safe explicitly for “toBeRemoved” collection
@see how to make a set thread safe explicitly

Friday, December 10, 2010

Syntax Highlighting in Blogger

We are quite new to blogging and when we blog our first posts faced difficulties when adding the code snippets. As beginners it was not that easy to find a solution for this, finally I came across this post which is quite interesting and helpful and it uses Javascript syntax highlighter .

Add Syntax Highlighting Step-by-Step
  1. Go to Design by from your Blogger Dashboard
  2. Select Edit HTML
  3. Add following code immediately after <head> tag (Better to Backup Template before editing) and Save Template and you are ready to use
    Note : remove any line of language you are not going to use
<link href='http://alexgorbatchev.com/pub/sh/current/styles/shCore.css' rel='stylesheet' type='text/css'/> 
<link href='http://alexgorbatchev.com/pub/sh/current/styles/shThemeDefault.css' rel='stylesheet' type='text/css'/> 
<script src='http://alexgorbatchev.com/pub/sh/current/scripts/shCore.js' type='text/javascript'></script> 
<script src='http://alexgorbatchev.com/pub/sh/current/scripts/shBrushCpp.js' type='text/javascript'></script> 
<script src='http://alexgorbatchev.com/pub/sh/current/scripts/shBrushCSharp.js' type='text/javascript'></script> 

<script src='http://alexgorbatchev.com/pub/sh/current/scripts/shBrushCss.js' type='text/javascript'></script> 
<script src='http://alexgorbatchev.com/pub/sh/current/scripts/shBrushJava.js' type='text/javascript'></script> 
<script src='http://alexgorbatchev.com/pub/sh/current/scripts/shBrushJScript.js' type='text/javascript'></script> 
<script src='http://alexgorbatchev.com/pub/sh/current/scripts/shBrushPhp.js' type='text/javascript'></script> 
<script src='http://alexgorbatchev.com/pub/sh/current/scripts/shBrushPython.js' type='text/javascript'></script> 
<script src='http://alexgorbatchev.com/pub/sh/current/scripts/shBrushRuby.js' type='text/javascript'></script> 

<script src='http://alexgorbatchev.com/pub/sh/current/scripts/shBrushSql.js' type='text/javascript'></script> 
<script src='http://alexgorbatchev.com/pub/sh/current/scripts/shBrushVb.js' type='text/javascript'></script> 
<script src='http://alexgorbatchev.com/pub/sh/current/scripts/shBrushXml.js' type='text/javascript'></script> 
<script src='http://alexgorbatchev.com/pub/sh/current/scripts/shBrushPerl.js' type='text/javascript'></script> 
<script language='javascript'> 
SyntaxHighlighter.config.bloggerMode = true;
SyntaxHighlighter.config.clipboardSwf = 'http://alexgorbatchev.com/pub/sh/current/scripts/clipboard.swf';
SyntaxHighlighter.all();
</script>
(Note: current version of syntax highlighter does not support text wrapping if you need that replace current with 2.1.364 in above code)

After that you can use Method 1 or 2 to apply it to your posts

Method 1 - using the <pre> tag

Method 2 - using the special <script> tag
<script type="syntaxhighlighter" class="brush: html"><![CDATA[
<html>
<head>
<title>Title of the HTML page</title>

<meta name="title" content="Help Give to the Carter Tomorrow Fund" /> 
]]></script> 
Note : you can replace 'html' to any of selected language (e.g. java, php, csharp, js, sql)

Change Theme
There are several themes currently available, this post uses shThemeDefault.css. To change the theme simply change this file to any of defined themes in here.

Encoding Code
If you are using "less than" or "greater than" symbols in your code snippets you have to use Method 2 but if you really want to use Method 1 use this to get escaped HTML code before adding it to your blog post.

Example Codes:

Before syntax highlighting (code to be inserted in the post Edit HTML view)


After syntax highlighting (final view of the code in the blog post)

That's it for syntax highlighting. Enjoy !

Thursday, December 9, 2010

Immutable Objects ?

What is an immutable object?

Immutable object is an object whose state cannot be changed or simply cannot be modified after its construction. That means once you instantiate an immutable object thats it you can never modify it.

There are many immutable classes provided by the Java platform. Examples are String, BigInteger, BigDecimal and primitive wrapper classes.

But why making classes immutable? There are many reasons,
  • Easy to design and implement
  • More secure and less error prone
  • Simple
  • Automatically thread-safe
  • Can be shared freely
The only disadvantage of immutable object can be the performance impact due to the creation of separate object for each and every distinct value.

So lets discuss the main objective of this post, how to create one? To make an immutable class you have to follow following rules,
  1. Make the class as final - ensures the class can not be overridden
  2. Mark fields as private and final - prevent from being modified directly
  3. Use constructor to construct the object completely - have to instantiate it in single line
  4. Remove any method which can change its state - state can not be changed
  5. Extra attention to mutable object fields (create new mutable object in any time passed into constructor or out of getter methods) - maintain immutability

Following is an example Employee class,
sample Employee immutable class


"Classes should be immutable unless there is a very good reason to make them mutable... If a class cannot be made immutable, limit its mutability as much as possible"
(By Joshua Bloch)


Cheers!

Monday, December 6, 2010

Iterator vs For Each

In many cases we need to iterate over collections , earlier versions of java provides few mechanisms to accomplish that task such as Iterator ,Enumerations before we going through new java feature for each ,lets discuss what are the diference's between those two interfaces

Enumerations is the older one among those two types it simple iterate through the Collection and it is not allow programmer to modify(allow remove) the collection while traverse.But more advance feature Iterator give freedom to developer to modify the iterator .

@see here is the source code of the Iterator

example of enumerations

for (Enumeration e = v.elements(); e.hasMoreElements();)
System.out.println(e.nextElement());

But there is a disadvantage with Iterator that it does not allow to traverse to bi directions and java language introduce a new feature called ListIterator it extends Iterator interface this new iterator allow developer to move bi direction.so we can iterate forward and backward
@see source code of ListIterator


Note : when we need to iterate through the collection just reconsider what is the actual need and then use appropriate mechanism rather than selecting Iterator interface for all :D and frequently going throw java docs it save us from many development errors .And don not forget to use java generics with collections because generics are more useful with collections.hopes to discuss generics in next article so stay in touch

Back to the main topic
The question is why we asked to use new "for each" loop,even Iterator interfaces(including ListIterator as well) are full filling most of the requirements,the simple answer is iteration over collections are uglier than than it should be and using Iterators are opportunity for errors
.Because coding is not just giving solutions for a problems ,we have to maintain readability of the code those kind of iterations are reduce the readability of the code,the lack of readability guide you to critical coding errors.
Following is a nice article that you may have gone through if not go through follow article it is no use of including it in side this blog :D
@see For-Each
if you don't have enough time to go through it follow is a simple demonstration how for each improves readability of the code
example :


is improved for each more nicer ? if so get use to that coding standards.

by the way just keep in mind that every programmer is doing mistakes even very experts,one way of avoiding those mistake is keep nice and clean code so make sure to use such mechanism to improve your readability of the code